Convert your Weber Smokey Joe into a smoker or mini WSM for about 30 bucks
(note: this article originally published October of 2010 on Meatninja.com. The Meatninja is now blogging for WKC and his site is no longer online)
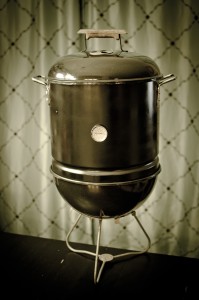
Mini WSM – in all its gloryI’ve long been into grilling with the occasional venture in smoking and barbecuing. But over the summer, I had a couple really fun experiences smoking baby back ribs on my 22″ Weber Kettle. The process took a long time, and I learned that keeping the temps low enough for true bbq can be challenging with a kettle grill.
I did my research and quickly determined that the best smoker (for me) is the Weber Smokey Mountain (or WSM). There’s a problem though, WSMs are $400. A tad pricey.
Around the same time, I rescued a Weber Smokey Joe from the neighbors trash. It’s a little 14.5″ grill. I wasn’t really sure what I was going to do with it, but it was too cute to let it go to a landfill.
And then I saw that a few professional and uber-enthusiasts who were building a mini smoker using a Smokey Joe and a $20 tamale steamer from wal-mart. Get this, people have won actual competitions with these little smokers. (Yeah, I actually read up and follow the bbq circuit now)
That settled it, I had to build this mini WSMsmoker, a tamale pot smoker to be exact. I did the research and found the steamer pot I needed. It’s a 32qt Tamale Steamer found at walmart. I hate walmart with a passion, but I braved it on the day after Christmas no less. Make sure you check online to see if your local store carries it – I didn’t and had to go to TWO F’in walmarts before I found it.
I cut the bottom out, drilled some holes, added some bolts and a thermometer. Tada!
I did my first smoke on it two weeks ago. Two small pork butts. I didn’t cook them long enough, they were a TINY bit dry – but they tasted AMAZING.
Enough chatter. On with the Instructions.
How to build a mini WSM / Smokey Joe Smoker (or Smoker Joe)
What you’ll need:
1. Weber Smokey Joe Silver The silver model will work best, because the Gold model has sidevents (suck). You can buy this new for $30. It’s a pretty amazing grill on its own, and you can still use it as a grill when you’re all done. You can also find Smokey Joes on craigslist for $10-$15 bucks. Some argue that the Gold model doesn’t get clogged with ash like the silver. I have yet to encounter this issue. There’s some VERY simple hacks to prevent it as well.
2.
3. A 12″ terra cotta (clay) saucer. I found mine at home depot in the garden department for $5.
4. An additional 14″ cooking grate (assuming you want your smoker to have TWO grates). $8
5. Some little nuts and bolts. I think the ones i used were 3/4″, size 8. They were 97 cents at walmart. These are for the standoffs to hold the top charcoal grate. $1.50 (buy the matching washers)
6. Thermometer(optional). I found mine at lowes for $7. It sucked, so i replaced it.
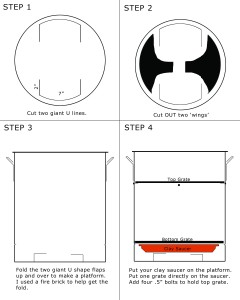
A printable instruction sheet with cut-out diagrams and assembly instructions
Step 1
Using a jigsaw with a metal cutting blade, cut the two really wide U shaped cuts. Don’t fold them yet, it’ll be easier after you make the other cuts. I learned the hard way. A dremel will work too, but will be more tedious. I borrowed a jigsaw from my awesome neighbor, Ron.
Step 2
With the same jigsaw, cut out the two batwing-like shapes. It’s ok if you don’t follow my pattern – just make sure you cut out enough for the smoke to get through, but leave enough to support the weight of the clay saucer, a charcoal grate, and a 14lb hunk of meat. The little strap of metal I left in the middle is for support. Some builders simply drilled several holes throughout the entire bottom; However, I’m not convinced that such a design would allow ample smoke/air flow.
Step 3
CAREFULLY fold in the flaps you cut in step 1. The edge of the metal can be really sharp. Wear gloves, use pliers. I placed a fire brick down there and folded the flaps up and around the brick. Then I unfolded one to take the brick out. If you have a better method, please share.
Step 4
Measure a distance from the top where you want your top grate. I put mine right at the bottom of the rivets for the handle. I was clueless, but it seems perfect now. Drill 4 holes all at the same distance from the top and put in 4 bolts. I used washers to help get a nice tight seal.
I painted mine black using a glossy engine enamel, found at your local auto parts store.
To assemble, wrap your clay saucer in foil for easier cleanup. Put this in the bottom of your pot. It should sit on those flaps and there should be plenty of ventilation for the smoke. This clay saucer will be a heatsink to absorb the direct heat, allowing your foods to cook via indirect heat and smoke.
Your lower cooking grate sits directly on top of the clay saucer. Your top cooking grate sits on the 4 bolts you put in.
Take the lid off your smokey joe. Your steamer should sit perfectly into the grill, and the grill lid should fit perfectly on top of the steamer pot. Like a match made in heaven.
—
Update: December 9, 2011.
I got several emails over the last year regarding how to use this little smoker.
Here’s the simplest method. Fill up the bottom bowl with charcoal and a few chunks of smokewood. I usually use 3 chunks of apple and one chunk of hickory for pork butts. Remove 8 coals from the bowl and light them with whatever method you have. I use a charcoal chimney and a paper towel drizzled with vegetable oil. Once those eight coals are fully ignited, add them to the bowl of unlit charcoal and assemble the smoker (add the middle section and lid).
Don’t add the meat yet! Wait for the smoke to lighten up. You want a thin, wispy, light bluish smoke. If your smoke smells like burning charcoal, it’s too early. Less is more.
After adding your meat, try to keep the temps around 250ish. If the temperature goes past 300, close the bottom vent a little bit. If your temp goes below 200, open the bottom vent more. Try to keep the top vent 100% open the entire time.
With pork butt (pulled pork), you can actually let the temps go up higher without major issues. Don’t stress about it.
If your temps are low and not coming up with open vents, you may need to stir the coals a bit. Remove the mid section while leaving the meat inside and the lid on and give the coals a quick stir with some tongs or other metal probing device. If you’re doing a long smoke, you might have to add some fresh unlit charcoal as well.
Good luck!


