Welcome, Guest

Shop Amazon.com and support the WKC | WKC T-Shirts

Author Topic: Help with first butt  (Read 2907 times)

chas1723

  • Smokey Joe
  • Posts: 17
Help with first butt
« on: July 01, 2017, 12:42:20 AM »
I plan on cooking a 7 pound butt in the next few days. I have never cooked one before. What rub would you use?  Also what temp would you cook it at? 

I am still new to cooking on a kettle and need all the help I can get.

Sent from my VS986 using Tapatalk


Shoestringshop

  • WKC Performer
  • Posts: 2637
Wife said "No more GRILLS in this house!" So I bought a 2nd house!

1buckie

  • WKC Ambassador
  • Posts: 9048
Re: Help with first butt
« Reply #2 on: July 01, 2017, 08:57:03 AM »
Ordinarily, this would be an easy answer......

I'd send up a few choice links, you peruse them, come back with perhaps some questions I/we get those covered & Bob's yer uncle.....BUT,

Photobucket has seen fit to ruin a choice part of Americana & I gotta find the pics, get them on the Kettle Club area & then bring them here.....

Hang in there, @chas1723   I'll be back............

Check into Shoe's story in the meantime....he's got it going good....
« Last Edit: July 01, 2017, 08:58:34 AM by 1buckie »
"If you want it fancy there is BBQ spray paint at home depot for that. "
    Covered, damper-controlled cooking.....IF YOU PLEASE !!!
           "But the ever versatile kettle reigned supreme"    

1buckie

  • WKC Ambassador
  • Posts: 9048
Re: Help with first butt
« Reply #3 on: July 01, 2017, 11:56:47 AM »
@chas1723

OK..........

Here's way you can try that a lot of folks get great results on the very first outing....

Set your coals approx. like this:


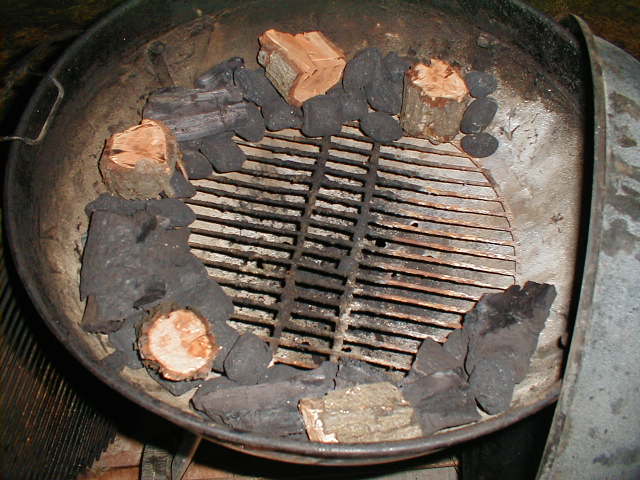
Leave that gap there....that's where you place about 10~12 LIT coals to "light the fuse", so to speak.....

A 1/2 hotel pan works well for a drip pan....these things drop a TON of juice.....


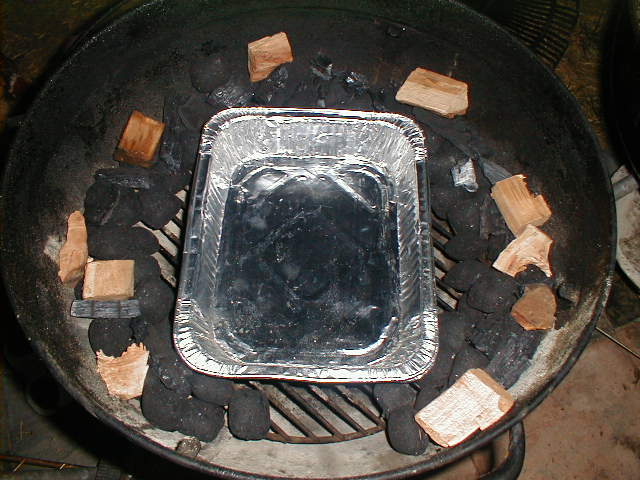
I'll often fill them w/ beans...with small bean-sized sweet pepper & onion bits, some spices & honey...double up the pan if you do this, as it gets kinda heavy...


I leave the fatcap on & diamond score, or "crown" it, but you can trim that down if you'd like.....there's plenty internal fat in the piece to do what's needed....
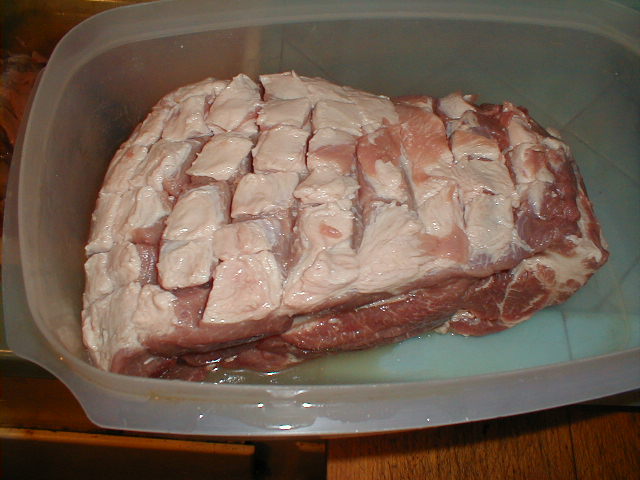


Rub 'em down....


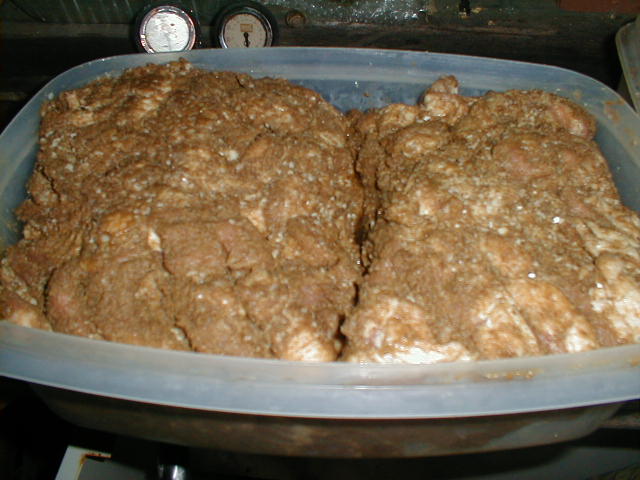
I just do that while the coals start lighting....you can get it ready sooner, but if it's kind of a salt-based rub, it will start to affect the taste if it sits, say overnite....

I use, usually, Big Ron's rub....from Texas, but only available over the 'Net, so you can use something on hand or make up a thing from what's in the cupboard....
If  it's a commercial rub, look for it to be as low-salt as possible...some is good, a lot WILL end up making the end product salty....

Dizzy Pig brand makes stuff from spices & herbs only & has some with little to no salt at all...not available everywhere, but check into that maybe (BGE dealers have them sometimes)

You can make something up using Kosher salt, black semi-coarse pepper, maybe paprika or some other items of your liking or personal taste.....a LITTLE brown sugar can be OK...using a lot, it may end up tasting "burnt" after a bunch of hours under heat....

Some folks use regular mustard or cooking oil of some type over the piece to help the rub stick...I've taken to just rinsing them, trim a little of anything goofy hanging off, "crown", and rub all sides & down into the areas created by the crowning....

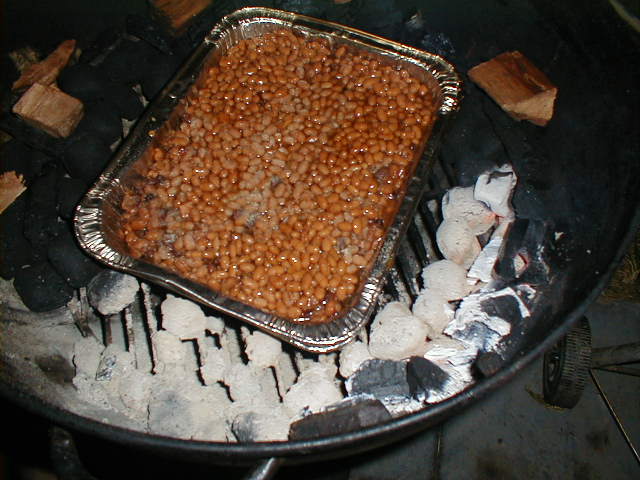
This jumps ahead a little, but shows adding in the bean pan halfway thru the cookup.....


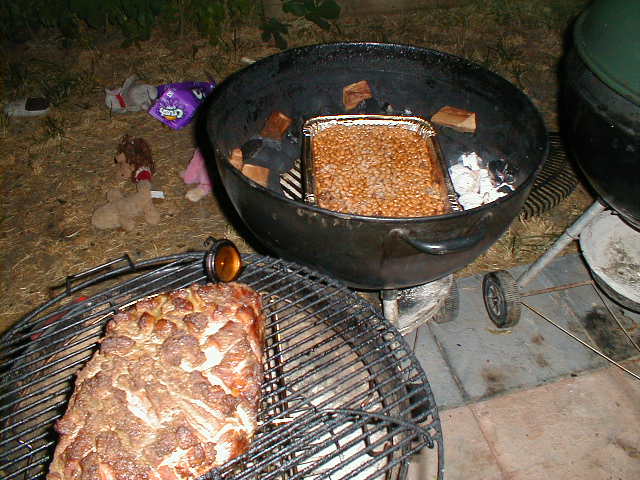
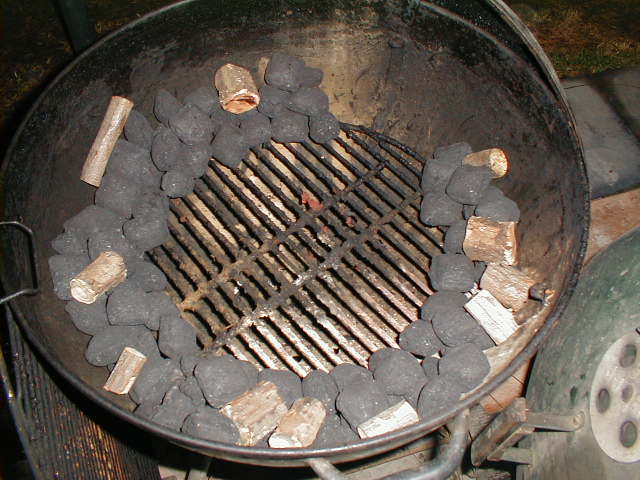
Also, in the last two cooking pics, you can see how the fuse, or "snake" burns around....everything may not burn completely, but if you get a reasonably tight pack on your setup, most of it will go OK........


When you've got the thing rubbed down, 10 or so coals lit & placed at the start of your chain (good idea to lite up, leave all vents open, lid on & heat up the machine for 15~20 minutes) go ahead with drip or bean pan, cooking grate & set the piece in the middle.....

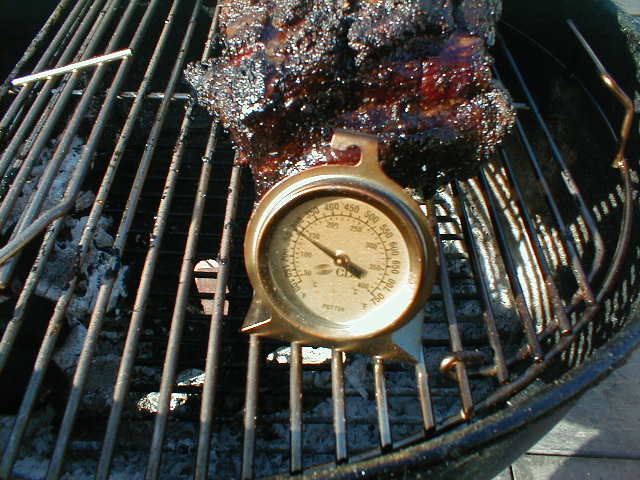
I use those little oven therms right on the grate @ Meat Level (<< Technical Term), but if you have a probe therm like Shoestring is using, set that in place....cap it & let 'er rip, tater chip.....


If you happen to drink beer, now's a good time....just don't overdo it & wreck dinner....


I personally aim for 260~275f grate temp....right at where he food is.......you can go lower or even higher, folks do, but lower will take quite awhile & higher has a drying out/ slight burnt edges risk all it's own....middle of the road is likely the best way on a first cook (this is NOT an attempt, it's going to happen...repeat, not pole vaulting, BBQ.....)

So go for about 1/2 hour, maybe 45 min. & then check....this gives time for the cooker to recoup lost heat from the large cold mass of meat it's just encountered & things to stabilize just a bit.....

Then, close vents down to about 1/2, top vent all open to exhaust freely, check in at this point & make sure your next coals are catching on & starting to burn....here's a little thought process on this from another story....

"Checked at about 45 min into the cook to make sure everyone's going to behave, once in the middle of the night (don't need a Maverick or a Guru, the dawgs wake me up to check, they know I'll want to know if things are OK...) Again at 7:30 AM & split one chimney of lump among them to keep all going smoothly, done approx 10:30 ~ 11:00.....
Slept thru most of it......

That's the long answer, the short answer is no babysitting, kettles are just not like offsets..... :)

The way I think about this is I'm not controlling the burn so much with the vents (available air) as it is with available fuel....
There's only a small area of fuel set up to burn & while you do have to pay attention to the vents, it's not as important as getting a good setup on the coal / wood at the start......
6 or 7 or 8 coals produces roughly 235 ~ 240°, if the vents are mostly open & it's left to settle in,
so if that 6~8 coals are all that's burning along the line at a time, there's where your temp is....."

That had to do with this cook ~~>


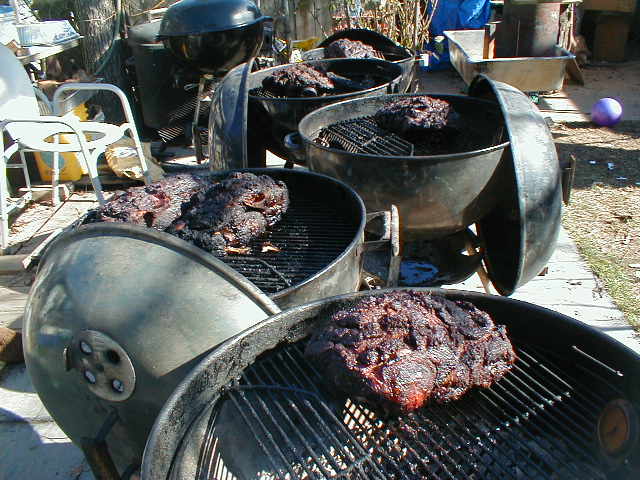
Six butts on five kettles.....overnite cookup with very little interference from me....Kettles know what to do.....allow them to work without too much checking & lifting the lid & great things happen


Standard timing on these things, for me, might go something like this:

10:00PM
lite fuse
rub up item(s)

10:30PM
the stuff goes on


4:00AM
quick check to see if everything's in a proper state
(no runaway fire, coals did not breach somewhere along the line & start to go out)

7:30~8:00AM
Check in again
Add more coals to the line of unburned, if needed
(things will go differently at different times of year, different outside air temp, etc.
it can be completed with one setup, but sometimes you have to pull the grate out or use the flip grate & add some more)

10:30~11:00 AM
may be time to pull the stuff off

How to tell:

Does it probe (small skewer, therm probe, icepick) like you're stabbing soft butter....seriously, it will "fall" into the meat....

Will the bone wiggle free without the meat sticking to it?


Temp (least reliable, for me anyways)

Very high 190's to 205/210f , deep internal, not touching the bone, if there's one in it...

THEN:

Wait 15~20 minutes
..and....
Wrap the bugger....I use foil, some use breathable UN-coated butcher paper

Wrap that packet in an old clean towel & place in a dry ice chest....with a few more towels as heat buffer

...AND....


WAIT......


I wait two hours.....for me, this is the very most important part...it lets the rest of the fat disintegrate, lets the juices redistribute throughout the piece & whets your appetite to boot !!!
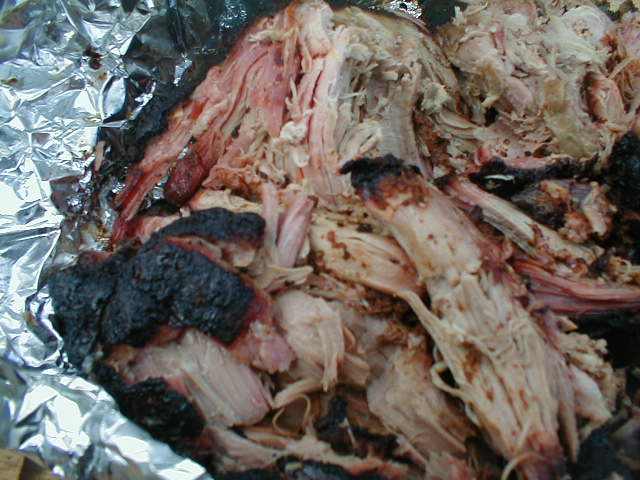
Then....

Pull....shred it up & eat on sammies with or without coleslaw or however you'd like....if you do beans, that's one of the best sides for this affair...slaw is good...a few pickles...good drinks, maybe some tater salad.....


Happy Fourth of July !!!!
"If you want it fancy there is BBQ spray paint at home depot for that. "
    Covered, damper-controlled cooking.....IF YOU PLEASE !!!
           "But the ever versatile kettle reigned supreme"    

1buckie

  • WKC Ambassador
  • Posts: 9048
Re: Help with first butt
« Reply #4 on: July 01, 2017, 12:29:12 PM »
"If you want it fancy there is BBQ spray paint at home depot for that. "
    Covered, damper-controlled cooking.....IF YOU PLEASE !!!
           "But the ever versatile kettle reigned supreme"    

chas1723

  • Smokey Joe
  • Posts: 17
Re: Help with first butt
« Reply #5 on: July 01, 2017, 02:14:32 PM »
Thanks for all the help. I really appreciate it.

Sent from my VS986 using Tapatalk


1buckie

  • WKC Ambassador
  • Posts: 9048
Re: Help with first butt
« Reply #6 on: July 01, 2017, 02:22:22 PM »
Go after it man.....you will be amazed what YOU can do with your Kettle !!!!
"If you want it fancy there is BBQ spray paint at home depot for that. "
    Covered, damper-controlled cooking.....IF YOU PLEASE !!!
           "But the ever versatile kettle reigned supreme"    

LiquidOcelot

  • WKC Performer
  • Posts: 2925
Re: Help with first butt
« Reply #7 on: July 01, 2017, 06:01:05 PM »
@1buckie [emoji119] [emoji144] the master has spoken

Davescprktl

  • WKC Ranger
  • Posts: 1999
Re: Help with first butt
« Reply #8 on: July 02, 2017, 05:02:32 AM »
All hail king Buckie!  Great tutorial. 
OKP Crimson, 22" H Code Brownie, SJS Lime, 22" CB Stacker, Red Q2200, Performer Deluxe CB slate blue

"If God didn't want us to eat animals, why did he make them out of meat?"  H. Simpson

greenweb

  • WKC Performer
  • Posts: 3033
Re: Help with first butt
« Reply #9 on: July 02, 2017, 06:09:42 AM »
All hail king Buckie!  Great tutorial.

+1  Most excellent! @ 1buckie.

We need one for Briskets cook. Do we already have one?

Chasing_smoke

  • WKC Ranger
  • Posts: 1530
Re: Help with first butt
« Reply #10 on: July 02, 2017, 06:57:13 AM »
Don't worry Chas, we've all been there.  The snake method as sir buckie showed is a bit more more to start but much less work once it's burning.  It's reliable and quite predictable. Honestly one of my personal favorite ways to smoke on the kettle.  The way it works is by simply limiting the amount of coals lit at one time.  Which provides a steady temp over a long period of time.  A cheap oven thermometer is a great investment.  You want it on the grate itself like sir buckie showed.  A lid thermometer is at the top of the grilll, since the Great rises and collects there before leaving through the vent it gives a false reading.  I used a version of the snake method and a probe thermometer on my last cook.  The lid thermometer read 325-350 and grate thermometer next to the meat under full clearance read around 220. 

Pork shoulder looks huge and challenging on the first try.  When I was researching my first cook everyone kept saying that pork shoulder is pretty foolproof.  In fact it is.  There is enough fat to keep it in good shape should something go not as planned.  If all else fails and you have to, you can finish it in the oven.  It will be done when you can pull the bone from the inside and it comes out clean.  While you are looking for an oven thermometer it's well worth the money to pick up a cheap meat thermometer.  They sell them at Walmart that looks like this

That $8 will help you from guessing.  I cook for  a living but rely on a thermometer pretty heavy.  Not so much to make sure the food is done but to make sure it's done without over cooking it.  The difference between a juicy cut off meat and a dry one is the temperature. 

If you decide to sauce the shoulder you need to wait until the very last 15-20 minutes.  Bbq = sugar.  Sugar will caramelized and burn if it's on too long. 

Lastly during the cook if you have questions just ask here.  I'm going to subscribe to it for the notifications and do my best to respond back.  Once you are on the other side of the cook, you'll realize it's really not as daunting as it seems. 


Sent from my iPhone using Weber Kettle Club mobile app
MH Copper mist, Daisy Wheel P, Homer Simpson OTG, Blue 18, Blue Mastertouch, SJS, Genesis Sliver B, Red 18 Bar-b-q-kettle Pat Pending, Copper performer

1buckie

  • WKC Ambassador
  • Posts: 9048
Re: Help with first butt
« Reply #11 on: July 02, 2017, 08:07:21 AM »
All hail king Buckie!  Great tutorial.

+1  Most excellent! @ 1buckie.

We need one for Briskets cook. Do we already have one?

@greenweb

Yeah, but PhotoPhucket has seen fit to destroy a section of American /World history w/their shenanigans....

Slowly, but surely, I'll migrate my photos to WKC & have reprints of some threads....

I hope everyone else who was affected by that decision figures something out...there's a BUNCH of stupendous cooks here @WKC & we need to see this stuff....ongoing,,,,,
"If you want it fancy there is BBQ spray paint at home depot for that. "
    Covered, damper-controlled cooking.....IF YOU PLEASE !!!
           "But the ever versatile kettle reigned supreme"    

chas1723

  • Smokey Joe
  • Posts: 17
Re: Help with first butt
« Reply #12 on: July 03, 2017, 08:24:11 AM »
Here we are at the 5 hour mark.

Sent from my VS986 using Tapatalk


mhiszem

  • WKC Performer
  • Posts: 3493
Re: Help with first butt
« Reply #13 on: July 03, 2017, 08:50:15 AM »
Lookin good! Lots of great tips as well.


Sent from my iPhone using Weber Kettle Club mobile app
WGA, Uline Green SJ, '95 Red M/T, '88 Red 18", '01 Plum SSP, Patent Pending Yellow

chas1723

  • Smokey Joe
  • Posts: 17
Re: Help with first butt
« Reply #14 on: July 03, 2017, 09:59:25 AM »
She seems to have stalled at 165.  I have finally got it to move to 169. The rain storm that came through didn't help with my grill temp. I have been trying to keep it around 250.

Sent from my VS986 using Tapatalk