Welcome, Guest

Shop Amazon.com and support the WKC | WKC T-Shirts

Author Topic: Ranch Kettle Methods  (Read 8308 times)

saxart

  • WKC Ranger
  • Posts: 934
Ranch Kettle Methods
« on: April 14, 2014, 06:01:48 PM »
I thought it would be a good idea for us to dedicate a spot where we can share our techniques for using a Weber Ranch Kettle. 

It would seem that Weber built these monsters to feed a truck-load of burger patties to an army, yet most of us like to put on a fine chunk of meat and try our hand at low and slow.   Not exactly what they were designed to do.

So, how do you do it?    Post up your methods.  What worked?  What didn't work?  What would you do differently?

I'll start........

Most of my cooks usually start like this.  (As you may remember, I tack-welded an expanded steel "wall" to the char-grate as a place to pile the charcoal.)


The other mod we did to the kettle was to remove the back flip-grate to facilitate tending the coals.  (Not to mention, no sense in super-heating the grate every time we cook on it)   I've also put some fire bricks between the coals and the meat to separate the meat from direct heating, but I'm not sure if that was necessary.

So far we've only done a couple of cooks on it.   First was a #14 Turkey:


Next was a #7 Prime Rib roast with taters on the coals...  (Sorry, blurry phone picture)


So far the only change I would make to these cooks is to try using more of a 'snake' to the coals rather than a fat pile.  It tends to light off all at once an can be difficult to control.   Another tip I would mention is that it seems to control temperature fluctuations to keep the top vent closed about 1/3 of the way.

What are your tips, tricks and experiences?
« Last Edit: April 14, 2014, 06:03:54 PM by saxart »
Interested in ANY offset handle SJs you may have.

G

  • WKC Ranger
  • Posts: 1586
Re: Ranch Kettle Methods
« Reply #1 on: April 14, 2014, 06:27:19 PM »
Not much to add here yet.....the handful of cooks completed on the Ranch have all been set-up identically to your first pic.  Like you, I have found that closing the top vent about 1/4 to 1/3 helps to regulate temps and it seems to run a bit hotter.  I hope to have more to add throughout the summer. 

saxart

  • WKC Ranger
  • Posts: 934
Re: Ranch Kettle Methods
« Reply #2 on: April 20, 2014, 08:12:19 PM »
A bit more information...   

Keep in mind, this thread isn't supposed to be a "show off your cooks" thread, but more of a "what METHODS work well for you with these big guys?  You'd think these kettles would just work like anything other kettle, toss in a bunch of coals and let 'er rip, but it doesn't seem to be that easy with an indirect cook when trying to maintain consistent temps

We did another cook (Brisket) on our RK for the Easter holiday this weekend. If you look at the very first picture I posted in this thread, you'll notice that the charcoal is literally dumped (right out of the bag!) onto the wall area of the grate.  This was certainly not a problem, but there is no consistency to this method.  You never know what you're going to be working with like that.   I want to get this kettle cooking consistently so we can trust it to run for an all-night cook without fears of ruining a great piece of meat.

I thought we'd try somewhat of a "snake" in the RK and see if that got us a nice long and consistent burn.   I realize it's tough to see in this pic, but this snake was made by starting with a flat ribbon of KB-briquettes 3 rows wide along the entire perimeter of the charcoal grate near the "wall".  After that I piled on the lump as deep as I could against the wall, but still keeping it on top of the three rows of briquettes.  It ended up being a slanted "drift" of lump coals, one edge very deep along the wall, the other end tapered down as it went away from the wall. The fire-bricks are there just as a heat-block in these pics.  They do not 'hold up' any of the piece of charcoal.  Whatever lump could be piled on top the 3 rows of KB is what we were working with.


Here was the final set up with the 13lb brisket.


In the end, the brisket turned out fine, and we learned is that this "snake" gave us nice consistent burn temps, but it only lasted for about 6.5hrs before it ran out of fuel.  I had to add more lump to give us the 9.5hrs we needed.   Granted, we probably would have gotten a longer burn had we used all briquettes, but I'm really trying to move to a mostly lump fuel with the cooks on all of our kettles.

Based on what happened during this cook, I now have a plan for the next cook.  We're going to go with 4-rows of KB instead of 3 row, then slide in the firebricks to make a trough between the "wall" and the firebricks which will then be filled to the top with lump.  This should give the kettle almost twice as much charcoal to work with.

If you have one of these RK's, post up what's worked for you're consistent low and slow cooks.  If you don't own an RK, but have some thoughts, please feel free to chime in.   Like I said, my ultimate goal is to have a method for a consistent low and slow cooker.
« Last Edit: April 20, 2014, 08:23:35 PM by saxart »
Interested in ANY offset handle SJs you may have.

pbe gummi bear

  • WKC Mod
  • Posts: 9059
Re: Ranch Kettle Methods
« Reply #3 on: April 20, 2014, 09:22:54 PM »
Sax, If you need a longer snake you can do it around more of the kettle you only have the snake going through about 160 (angular) degrees or so. You can go to 270 or 300 degrees to get a longer burn. Maybe even a big "U" shape. This might seem obvious, but the nice things about the RK grate is that it sits on a full ridge. I use a tongs or spatula to rotate the entire grate as its loaded to get the meat away from the heat source. You can use this trick to move all the meat away from the heat without having to pick each piece up at once. Works super well for turds/wings too.
"Have you hugged your Weber today?"
Check out WKC on Facebook:
https://www.facebook.com/pages/Weber-Kettle-Club/521728011229791

1buckie

  • WKC Ambassador
  • Posts: 9048
Re: Ranch Kettle Methods
« Reply #4 on: April 21, 2014, 09:24:54 AM »

 Some thoughts on charcoal & wood burning:

And, keep in mind, I've only used a Ranch once, rented for burgers & dawgs & WSM's a couple times......

This is an excerpt from another post:
(see the red hi-lites below)

The intro I put up in "Introduce" forum had a pic of this cook ~~>


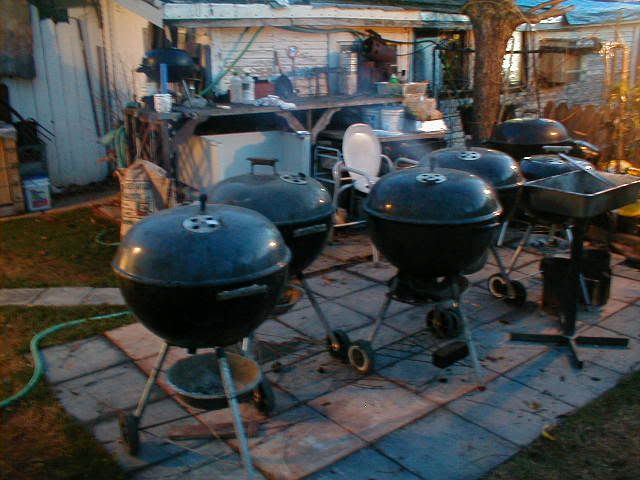
Six shoulders on 5 kettles, including two on a standard & 1 on an 18-1/2", as I wanted to see if it would act the same as a regular size kettle....
It went fine but a bit harder to keep UP TO temp part of the time .....
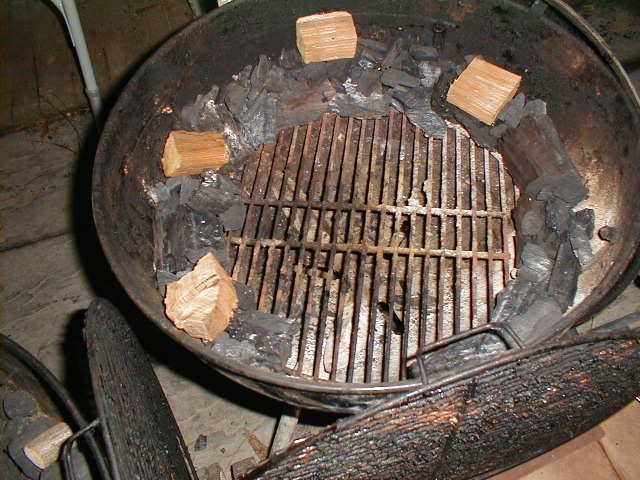
Here's the sets ~~>

Maple with Wicked lump, heliocopter vents....


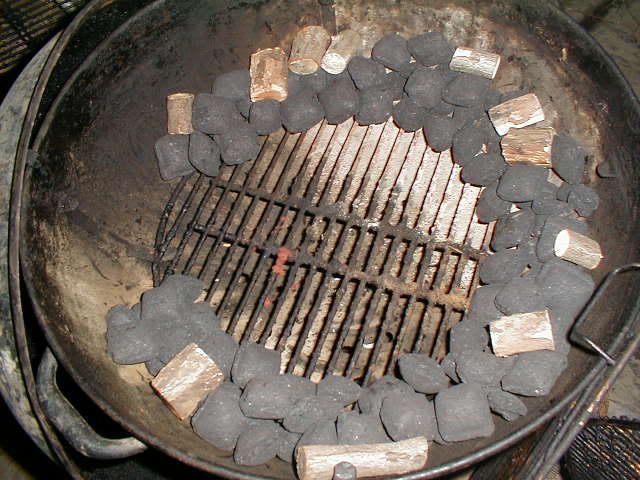
Stubb's briquettes with pecan chunks, daisy wheel vents...


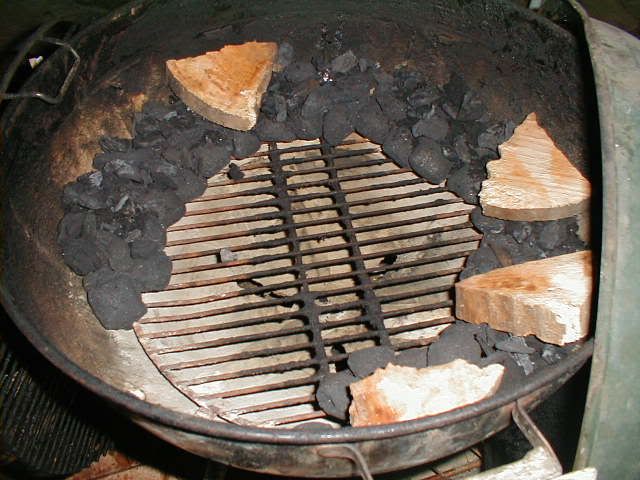
Both types of coal,with aged black walnut, new style vents...


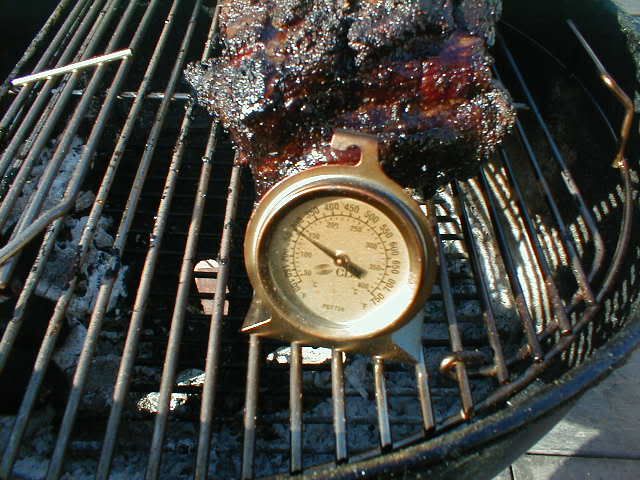
Very early the next AM, abt 250° 


This is the 18-1/2", running at about 275° ~ note open vents below, this is when I'm rampimg up the heat a little a bit later into the morning...


Total cook time was approx 13-1/2 to 14 hrs.
Checked at about 45 min into the cook to make sure everyone's going to behave, once in the middle of the night (don't need a Maverick or a Guru, the dawgs wake me up to check, they know I'll want to know if things are OK...) Again at 7:30 AM & split one chimney of lump among them to keep all going smoothly, done approx 10:30 ~ 11:00.....
Slept thru most of it......

That's the long answer, the short answer is no babysitting, kettles are just not like offsets..... :)

The way I think about this is I'm not controlling the burn so much with the vents (available air) as it is with available fuel....
There's only a small area of fuel set up to burn & while you do have to pay attention to the vents, it's not as important as getting a good setup on the coal / wood at the start......
6 or 7 or 8 coals produces roughly 235 ~ 240°, if the vents are mostly open & it's left to settle in,
so if that 6~8 coals are all that's burning along the line at a time, there's where your temp is.....

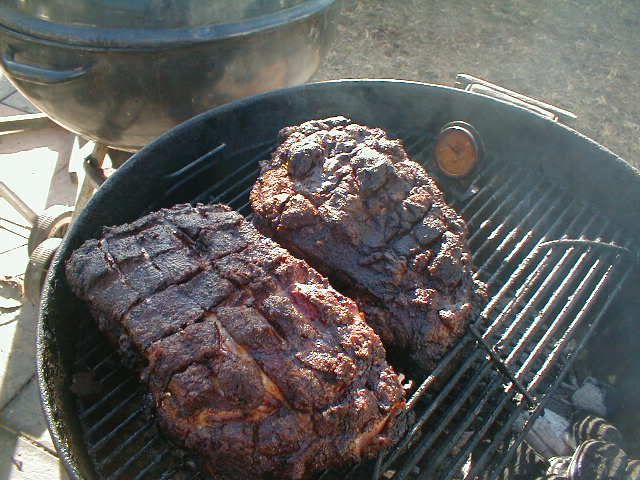
It has run amok before, & I ended up doing hot & fast butts, even though I didn't really want to
The two I did last night went swell, but actually burned all the way around the ring & I added maybe 1/4 circumference to where the burn would have stopped.

This works really good & I've heard of people doing 18 hour cooks like this, although I don't have their specifics.....


****************************

Now, that being said, the Ranch is much larger & a Jim Minion method works a bit different on a WSM or the like & an offset may also hold some clues........

One thing I've seen people say that makes sense with an offset & also other cookers is to have your fire start opposite the intake vents & burn back toward them........keep that in mind, although it doesn't weigh in as much cooking on a kettle that's basically round, it is a small slice of the pie......

I see people's load ups for WSM's & UDS barrel baskets where they load up a bunch of charcoal, with wood chunks interspersed throughout & then dump a small amount of lit coals on top or in an indentation in the pile.....fire is burning BACK DOWN toward the intake vents.........

then, what do you do?

Adjust airflow so that just enough of the coals are burning to get to your target temp.....time after time I've seen people fairly new to running an UDS & even some WSM people say: "It got away from me & I had a heckuva time getting the temp back down!!!"

There's a great dissertation by the Mod over on Smoke Ring about how to fire, then close vents as you reach temp plateaus,  bringing an UDS up to cooking level......hit a temp, close a vent, hit another, close a vent......etc.........so you come up underneath the target temp & can then play with the fine tuning........

Same general thing I'll do with a 22" kettle, but the closing of vents has much more to do with the ambient temps, i.e. weather conditions, than the actual heating of the cooking chamber: See the red hi-lites up above............the amount of fuel set up is primary, the amount of air is secondary......in the case of the larger cooking area & sheer cubic volume of the Ranch, my guess would be that those two variables will be CLOSER together in importance........

If you were to use a seemingly thick pile like you've shown ( seems heavy to me anyway) think about it a bit more like the Minion method type thing for the WSM/ UDS burns, keeping in mind also where the burn STARTS (the burn toward the vent thing)........so, in that case, perhaps starting off with a goody amount of lit coals & crimping vents as the temp comes up, until you're at or near where you'd like........


The other basic direction that could be taken is to thin out the coal pack, start with less lit coal & "run even".........not really sure how many exactly to stack up & exactly how many lit, but I would
guess it may be roughly 1.75 times the amount of a 22-1/2"............

One other thought comes from watching people use big offsets that have a lot of metal to heat......flamethrower !!!!
Maybe heat the general interior area, gently, with a torch, then fire up......that way it's not taking up a whole bunch of fuel just to heat the extra open spaces & metal..................

IIRC correctly, the Ranch has 3-wheel bottom vents & one centered at the top, right?

One Touch Platinum has an OTP (imagine that!) & may have some insight as to how a centered vent may be a little different....I see you Ranchers talking about crimping the exhaust to help control things......may be because the flow is more rapid going straight up?

I would also think in terms of WHERE you set up the coals in relation to the intakes; I think about this every time I use a 3-wheeler & even sometimes with the helicopter vents.......am I using most of two vents, or am I closer to the 'odd vent out'? 

Setting up either way, the mental motif I use is taking a basketball down court:

Slow moving, setting up a strategy, dribble air more slowly over the lit area of coals......faster moving (higher heat cook), up the forward movement & tempo of the dribble.....fast break: do up some steaks !!!!


All the above may be bullshit, so take it for what you can use & file the rest away for future reference......

One more thing I found:

Check out  phillyc0wb0y's posts.......

http://weberkettleclub.com/forums/food-pr0n/fun-with-the-ranch-kettle/msg33183/#msg33183


http://weberkettleclub.com/forums/food-pr0n/rk-seafood-feast/msg37948/#msg37948


http://weberkettleclub.com/forums/weber-kettles-accessories/ranch-kettle-owners-thread-showoff/msg82949/#msg82949


This guy knows how to run a Ranch.....seems to me.......

"If you want it fancy there is BBQ spray paint at home depot for that. "
    Covered, damper-controlled cooking.....IF YOU PLEASE !!!
           "But the ever versatile kettle reigned supreme"    

MINIgrillin

  • WKC Ranger
  • Posts: 1887
Re: Ranch Kettle Methods
« Reply #5 on: April 21, 2014, 09:59:17 AM »
Hellofa good post Buckie!
Seville. CnB performer:blue,green,gray. 26r. 18otg. Karubeque C-60.

Bbqmiller

  • WKC Ranger
  • Posts: 915
Re: Ranch Kettle Methods
« Reply #6 on: April 21, 2014, 05:11:58 PM »
Used a CB charcoal ring (22 WSM) and charcoal basket to make a well defined area for the coals.

Filled with two chimneys of lump and cooked some grub. This was my first cook with RK. It seemed to work pretty well.

saxart

  • WKC Ranger
  • Posts: 934
Re: Ranch Kettle Methods
« Reply #7 on: April 22, 2014, 02:54:11 AM »
Thank you for the additional thoughts so far.  This is going to be an on-going topic with future updates as the cooking continues.

Buckie-
I was hoping you would chime in here.   That post was EPIC!   What you mention is very true.  In previous cooks, I was using more of a "minion method" starting with 6-10 coals lit on one end of the pile, and now moved to more of a 'snake' where the controlling function was more about the fuel amount and less about the air-flow control.   Your final suggestion seems spot-on.  Instead of adding width to the snake, next time I may try to extend the length of the snake as PBE suggests either by going "around the world" with the coals, or doubling the snake back against itself.

Keep the thoughts coming...
Interested in ANY offset handle SJs you may have.

Hogsy

  • WKC Performer
  • Posts: 3649
Re: Ranch Kettle Methods
« Reply #8 on: April 22, 2014, 03:45:21 AM »
Golly and I use baskets when doing high heat cooks which is all we've done so far. Our RK has a little spalling on one side of the bowl, I believe the baskets help to stop spalling by keeping the lit coals outof direct contact with bowl


Here's a basket in action, one basket was enough to cook 10 chooks in an hour/ hour an a half

And some expanded for grilling

The only problem we found with the baskets was the weight.
Because there's no tabs to hold the charcoal grate, when only using one full basket the charcoal grate tends to slip down on an angle
Here's a link to thread on the RK rotisserie Golly and I made as well
http://weberkettleclub.com/forums/weber-kettles-accessories/rk-roti/msg72097/#msg72097
I'm only 2 or 3 kettles away from being that creepy guy down the street with all the Webers
                            WKC Collaborator
                        Viva La  Charcoal Revolution

1buckie

  • WKC Ambassador
  • Posts: 9048
Re: Ranch Kettle Methods
« Reply #9 on: April 22, 2014, 07:46:25 AM »

 SAX .....I hope it helps out !!!!

 I've come to the conclusion that I must have picked up some idea of how this works over time......

 The threads below are me walking a guy thru setting up a pork butt on a charcoal grill that's a part of a hybrid, gas, charc. infrared.....sorta like a Santa Maria straight grill, where the fuel is right underneath the food................he did it & it worked !!!!

 Setup:
 
http://www.thesmokering.com/forum/viewtopic.php?p=647257&highlight=#647257
 
 
Cook & finish:
 
http://www.thesmokering.com/forum/viewtopic.php?p=647466&highlight=#647466
"If you want it fancy there is BBQ spray paint at home depot for that. "
    Covered, damper-controlled cooking.....IF YOU PLEASE !!!
           "But the ever versatile kettle reigned supreme"    

G$

  • WKC Performer
  • Posts: 3268
Re: Ranch Kettle Methods
« Reply #10 on: April 22, 2014, 09:02:45 AM »
I don't have an RK and I am not looking for one but this is a great thread.

1buckie

  • WKC Ambassador
  • Posts: 9048
Re: Ranch Kettle Methods
« Reply #11 on: April 22, 2014, 04:28:11 PM »

 BBQ Miller's & Golly & Hogsy's containment methods may work even better than the other two ways of charcoal setups........for a large number of different types of cooks........

Wondering, from these folks, are those containing setups easily transferred to a long & low cook, how easy is it to add coals?

And for Hogsy.....one foodsafe firebrick across from the charcoal basket to keep it from slipping?
« Last Edit: April 22, 2014, 05:16:56 PM by 1buckie »
"If you want it fancy there is BBQ spray paint at home depot for that. "
    Covered, damper-controlled cooking.....IF YOU PLEASE !!!
           "But the ever versatile kettle reigned supreme"    

Hogsy

  • WKC Performer
  • Posts: 3649
Re: Ranch Kettle Methods
« Reply #12 on: April 22, 2014, 05:39:24 PM »
Good idea with the brick Buckie, why didn't I think of that ::)
I think the basket would be big enough to do some sort of minion setup, it holds nearly 2 chimneys worth of charcoal.
« Last Edit: April 23, 2014, 02:38:52 PM by Hogsy »
I'm only 2 or 3 kettles away from being that creepy guy down the street with all the Webers
                            WKC Collaborator
                        Viva La  Charcoal Revolution

Bbqmiller

  • WKC Ranger
  • Posts: 915
Re: Ranch Kettle Methods
« Reply #13 on: April 23, 2014, 02:29:45 PM »


 BBQ Miller's & Golly & Hogsy's containment methods may work even better than the other two ways of charcoal setups........for a large number of different types of cooks........

Wondering, from these folks, are those containing setups easily transferred to a long & low cook, how easy is it to add coals?

And for Hogsy.....one foodsafe firebrick across from the charcoal basket to keep it from slipping?
Good question buckie - this wasn't really a low and slow cook (higher cook beer can chicken). I do think loading up the 22 WSM charcoal ring and doing a minion (with or without a water pan) would be feasible for low and slow on the RK.
You are right about adding fuel - the older RK grates have these small hinges. May have to take my dremel and just carve out a bigger area on one side.

1buckie

  • WKC Ambassador
  • Posts: 9048
Re: Ranch Kettle Methods
« Reply #14 on: April 23, 2014, 03:18:57 PM »


 For both of the last two posters:

I just saw Joel got some extra big sized baskets & if other decent sized containers are available, could a person start with one containment burning, then as that ended, start off another with a few lit charcoals?

It seems the area underneath might be big enough to put together duplicate sets & just fire one set after another instead of continually adding coals to the one.......

 PS: this is for longer cooks........
"If you want it fancy there is BBQ spray paint at home depot for that. "
    Covered, damper-controlled cooking.....IF YOU PLEASE !!!
           "But the ever versatile kettle reigned supreme"